
Email Validation (Beta)
Learn how to verify email addresses, interpret validation statuses, and download Email Validation results in Aurora SendCloud.
Get Early Access to Our New Email Validation Feature (Closed Beta) . Contact Us
Use Email Validation to check whether addresses can receive mail before you send campaigns or add contacts to your database.
1. Understand Email Validation
Email Validation checks whether an email address is valid and can receive mail. It is a real-time service, which means the status of an address can change over time.
Why validate your email list?
- Protect your sender reputation. Sending to invalid addresses triggers bounces, which damage your sender score and increase the likelihood of being flagged as spam.
- Reduce bounce rates. Invalid addresses generate hard bounces. High bounce rates hurt deliverability and can get your domain or IP blocked.
- Save costs. Most email service providers charge by the number of messages sent. Validating before you send means you don't pay for addresses that will never receive your message.
- Maintain list quality. Over time, addresses become invalid as people switch jobs, abandon accounts, or opt out. Regular validation keeps your list accurate and reliable.
Best practices:
- Validate at the point of capture. Add email validation to your signup forms to block typos, fakes, and disposable emails before they enter your database.
- Clean your list regularly. As much as 28% of your database can go bad every year. Run bulk validation at least quarterly, or monthly if you manage a larger list.
2. Using Email Validation
- In the Aurora SendCloud platform sidebar, open Email Validation.
- Check the Credits before you start. 1 credit = 1 email verification.
- Choose the verification method that matches the size of your list.
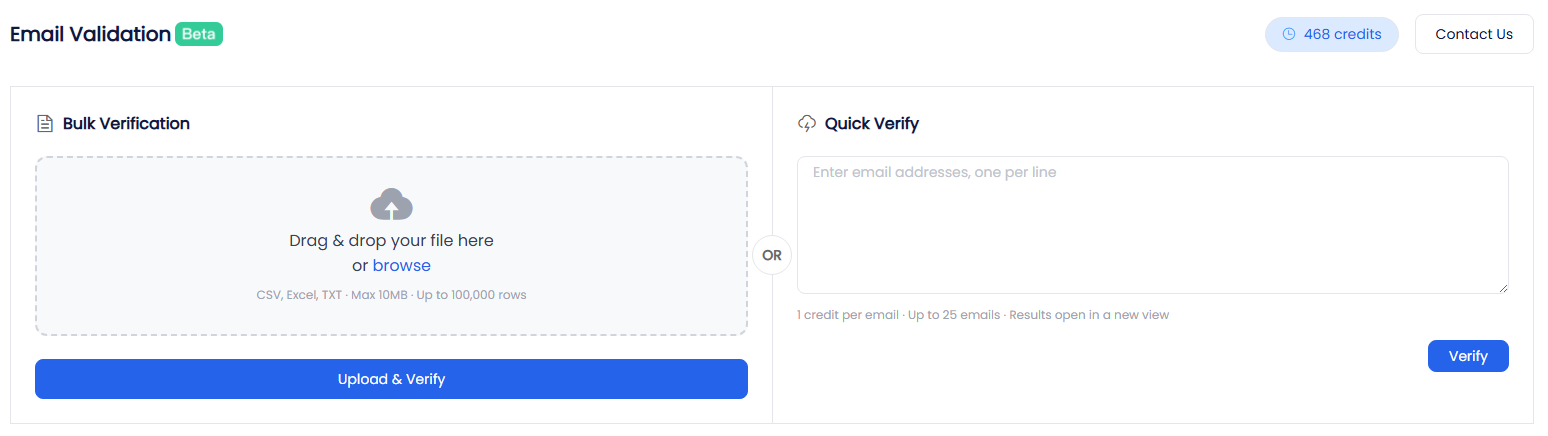
The Email Validation page contains four areas:
- Credits — shows your available balance. 1 credit = 1 email verification.
- Bulk Verification — upload a file to verify a large list at once.
- Quick Verify — enter up to 25 email addresses manually for instant results.
- Verification History — view past tasks and download results.
3. Verify Email Addresses
Bulk Verification
Use Bulk Verification to verify a large list in one batch.
- Prepare a CSV, Excel, or TXT file that contains the email addresses you want to verify.
- Upload the file in Bulk Verification.
- Wait for the verification task to complete.
- Track progress in Verification History.
- Download the results after you receive the in-app completion notification.
Bulk Verification supports the following limits and behavior:
- Supports files up to 10 MB and 100,000 rows.
- The system auto-detects the email column.
- Duplicates and invalid formats are automatically skipped without consuming credits.
- Results are delivered asynchronously, so large files may take time to finish.
Quick Verify
Use Quick Verify when you need to check a small number of addresses immediately.
- Enter up to 25 email addresses, one per line.
- Submit the verification request.
- Review the results on the results page.
- Click any row to view the status, sub-status, and recommendation for that address.
4. Understand Your Results
Each verified email receives a status and a sub-status to help you decide whether to send to the address.
Status Codes
| Status | Meaning |
|---|---|
valid | The address is valid and can receive mail. |
catch_all | The domain accepts all emails. It is not possible to confirm whether this specific address exists. |
unknown | The status could not be determined. The server did not respond or was temporarily unavailable. |
invalid | The address is invalid. Sending will result in a bounce. |
do_not_mail | High-risk address (role-based, disposable, or on a suppression list). |
abuse | An address associated with abusive behavior (frequently marks emails as spam). |
Recommendations
| Status | Recommendation | Why |
|---|---|---|
valid | Safe to send | The address is valid and can receive mail. |
catch_all | Use with caution | The domain accepts all emails. It is not possible to confirm whether this specific address exists. |
unknown | Use with caution | The status could not be determined. The server did not respond or was temporarily unavailable. |
invalid | Do not send | The address is invalid. Sending will result in a bounce. |
do_not_mail | Do not send | High-risk address. Sending will harm your sender reputation. |
abuse | Do not send | The recipient has a history of marking emails as spam. Sending risks complaints and reputation damage. |
Sub-Status Codes
Sub-statuses provide additional context for the primary status.
For valid addresses:
| Sub-Status | Meaning |
|---|---|
accept_all | The domain accepts all emails; this specific address has been individually verified. |
role_based_accept_all | A role-based address on a catch-all domain. |
alias_address | An alias or forwarding email address. |
leading_period_removed | A Gmail address with a leading period removed. |
alternate | A possible alternate address for the same person. |
gold | A high-engagement contact. |
For invalid addresses:
| Sub-Status | Meaning |
|---|---|
mailbox_not_found | The mailbox does not exist. |
does_not_accept_mail | The domain sends but does not receive mail. |
no_dns_entries | The domain has no DNS records. |
failed_syntax_check | The address fails basic format rules. |
possible_typo | A likely spelling error in the address. |
mailbox_quota_exceeded | The mailbox is full and cannot accept new messages. |
unroutable_ip_address | The domain routes through an unreachable IP. |
For do_not_mail addresses:
| Sub-Status | Meaning |
|---|---|
role_based | A role-based address (e.g., admin@, support@). |
disposable | A disposable or temporary email address. |
role_based_catch_all | A role-based address on a catch-all domain. |
global_suppression | The address is on a global suppression list. |
possible_trap | A suspected spam trap address. |
toxic | An address associated with abusive behavior. |
mx_forward | A domain that forwards mail rather than receiving it. |
For unknown addresses:
| Sub-Status | Meaning |
|---|---|
antispam_system | An anti-spam system blocked the verification. |
greylisted | The server temporarily rejected the verification attempt. |
failed_smtp_connection | Could not establish a connection to the mail server. |
timeout_exceeded | The verification request timed out. |
mail_server_did_not_respond | The mail server did not respond to the verification. |
mail_server_temporary_error | The mail server returned a temporary error. |
forcible_disconnect | The connection was forcibly closed during verification. |
exception_occurred | An unexpected error occurred during verification. |
5. Download Results Before They Expire
All verification tasks appear in Verification History at the bottom of the Email Validation page. Each task record includes the file name, email count, credits used, and completion time.
Task records remain visible permanently, but downloadable results do not.
Results are retained for 72 hours. After that, they can no longer be downloaded or viewed.
The 72-hour retention period helps prevent outdated results from being used. Email addresses change over time, so an address that is valid today may be invalid later.
Download your results as soon as verification completes. For important campaigns, re-verify your list close to the send date.