
Campaigns
Campaigns are your primary tool for reaching contacts with targeted messaging. Whether you're sending newsletters, promotions, or announcements, this guide covers everything you need to create, optimize, and track successful campaigns.
Types of Campaigns
Campaigns are your primary tool for reaching contacts with targeted messaging. You can create four types of campaigns to fit your marketing goals:
Email Campaigns
Email campaigns are your primary tool for reaching contacts with targeted messaging. Whether you're sending newsletters, promotions, or announcements, this guide covers everything you need to create, optimize, and track successful campaigns.
Create a Regular Email Campaign
Follow these steps to create and send a standard email campaign:
Step 1: Define Your Audience
Determine recipients: Choose who will receive your campaign:
- All Contacts: Send to your entire contact list
- Tags: Target contacts with specific tags (e.g., "VIP Customers", "Newsletter Subscribers")
- Segments: Use advanced filtering to target specific contact groups
💡 Tip: Using targeted segments typically results in higher engagement rates than sending to all contacts.
Step 2: Configure Sender Information
Choose the sender: This appears as the "From" name in recipients' inboxes
- Use a recognizable name or brand
- Consistent sender names build trust and improve open rates
Set reply email address: Where replies will be sent
- Use a monitored email address
- Consider using a dedicated reply address for campaigns
Step 3: Select Content
Select email template: Choose from your saved templates
- Ensure the template matches your campaign goals
- Preview the template on different devices before sending
Step 4: Advanced Configuration (Optional)
Configure advanced settings: Access additional features such as:
- Google Analytics tracking
- Warm-up sending for better deliverability
Step 5: Schedule & Send
Set execution time: Choose when to send your campaign
- Send now: Immediate delivery
- Schedule: Set a specific date and time
- Time zone: Ensure you select the correct time zone for your audience
⚠️ Important: Double-check your time zone selection to avoid sending at unintended times.
Create an A/B Test Email Campaign
A/B testing helps you optimize campaigns by comparing different variations. Here's how to set up effective tests:
Step 1: Design Your Test
Choose Test Element
Select what to test (choose one):
| Test Type | What It Measures | Best For |
|---|---|---|
| Subject Line | Open rates | First impressions, curiosity |
| Email Content | Click rates, engagement | Message effectiveness |
| Sender Name | Open rates, trust | Brand recognition |
| Send Time | Open rates, engagement | Audience behavior |
💡 Note: Each test supports up to 3 variations (A, B, C).
Set Success Metrics
Choose winning criteria:
- Open Rate: Best for subject line and sender name tests
- Unique Open Rate: Focuses on individual engagement
- Click Rate: Best for content and call-to-action tests
- Unique Click Rate: Measures individual click behavior
- Delivery Rate: For deliverability optimization
Evaluation time: Set how long to run the test (recommended: 2-24 hours)
Configure Test Size
Set test percentage: What portion of your audience participates in the test
- 20% test: 20% split between variations, 80% receive the winner
- 50% test: 50% split between variations, 50% receive the winner
- Custom: Set your preferred split
🎯 Recommendation: Use 20-30% for tests to maximize the impact of the winning variation.
Step 2: Complete Campaign Setup
Follow the same configuration steps as regular campaigns:
- Select recipients (All Contacts, Tags, or Segments)
- Configure sender information
- Set reply email address
- Choose email template
- Schedule execution time
Advanced Campaign Settings
Google Analytics Tracking
Track campaign performance in Google Analytics by automatically adding UTM parameters to your email links.
Available Parameters:
- Campaign Name (
utm_campaign): Identify the specific campaign - Campaign Source (
utm_source): Automatically set to "SendCloud" - Campaign Medium (
utm_medium): Automatically set to "email" - Campaign Term (
utm_term): Optional keyword tracking - Campaign Content (
utm_content): Distinguish between different links
Example Transformation:
Original: https://www.aurorasendcloud.com
Enhanced: https://www.aurorasendcloud.com?utm_campaign=newsletter&utm_source=SendCloud&utm_medium=email
Warm-Up Sending
Improve deliverability by gradually increasing sending volume, especially important for new domains or high-volume campaigns.
How It Works:
- Starts with conservative sending rates
- Monitors delivery performance automatically
- Increases rate when delivery exceeds threshold
- Decreases rate when delivery drops below threshold
Rate Progression: Starting at 100 emails/hour, the system can scale up to 25,000 emails/hour over 15 steps based on performance.
| Step | 1 | 2 | 3 | 4 | 5 | 6 | 7 | 8 | 9 | 10 | 11 | 12 | 13 | 14 | 15 |
|---|---|---|---|---|---|---|---|---|---|---|---|---|---|---|---|
| Hourly | 100 | 250 | 500 | 650 | 800 | 1,000 | 1,400 | 2,000 | 2,500 | 3,500 | 5,000 | 8,000 | 12,000 | 17,500 | 25,000 |
| Daily | 1,000 | 2,500 | 5,000 | 6,500 | 8,000 | 10,000 | 14,000 | 20,000 | 25,000 | 35,000 | 50,000 | 80,000 | 120,000 | 175,000 | 250,000 |
Campaign Status & Management
Understanding campaign states helps you manage your email marketing effectively:
| Status | Description | Available Actions |
|---|---|---|
| Waiting | Scheduled but not yet sent | ✅ Edit, Delete, Reschedule |
| Sending | Currently being delivered | 📊 View Reports, Monitor Progress |
| Completed | Successfully sent | 📊 View Reports, Clone Campaign |
| Failed | Encountered errors | 🔍 Review Error Details, Retry |
Common Failure Causes
Troubleshooting Failed Campaigns
Most Common Issues:
- Insufficient Email Credits: Check your account balance
- Daily Quota Exceeded: Wait for quota reset or upgrade plan
- Invalid Recipients: Check contact list quality
- Template Issues: Ensure template exists
Campaign Analytics & Reports
Understanding your campaign performance is crucial for improving your email marketing results. Aurora SendCloud provides comprehensive analytics to help you track delivery, engagement, and overall campaign success.
Key Metrics Overview
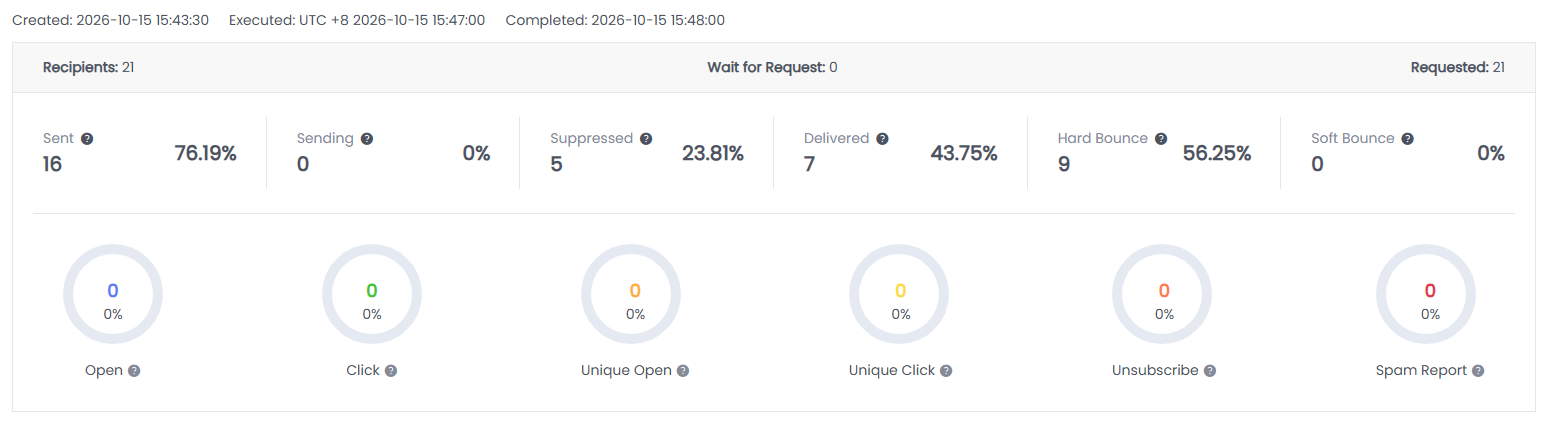
| Metric | Description |
|---|---|
| Requested | Total number of email send requests submitted to Aurora SendCloud. |
| Sent | Number of emails sent by Aurora SendCloud. Rate = Sent ÷ Requested |
| Sending | Emails currently being processed through the delivery pipeline. Rate = Sending ÷ Requested |
| Suppressed | Number of suppressed messages due to past Suppression. Rate = Suppressed ÷ Requested |
| Delivered | Number of emails successfully delivered to recipient's mailbox provider. Rate = Delivered ÷ Sent |
| Hard Bounce | Number of permanent failures from invalid addresses. Rate = Hard Bounce ÷ Sent |
| Soft Bounce | Number of emails that cannot be delivered temporarily. Issues include a full mailbox, temporary recipient server issues, or spam filtering. Rate = Soft Bounce ÷ Sent |
| Open | Total email opens, including multiple opens by the same recipient Rate = Open ÷ Delivered |
| Click | Total link clicks, including multiple clicks by the same recipient. Rate = Click ÷ Delivered |
| Unique Open | Number of individual recipients who opened the email at least once Rate = Unique Open ÷ Delivered |
| Unique Click | Number of individual recipients who clicked at least one link. Rate = Unique Click ÷ Delivered |
| Unsubscribe | Number of recipients who clicked unsubscribe links. Rate = Unsubscribe ÷ Delivered |
| Spam Report | Emails marked as spam by recipients Rate = Spam Report ÷ Delivered |
Delivery Performance Analysis
Monitor how well your emails are being delivered and identify potential issues:
- Email status statistics: Overview of successful deliveries, bounces, and failures
- Daily send trends: Track delivery patterns grouped by day to identify optimal sending times
- Domain-based performance: Analyze how different email providers (Gmail, Outlook, etc.) handle your campaigns
- Invalid email categorization: Understand why emails failed validation and improve list quality
- Bounce analysis: Detailed breakdown of soft bounce reasons to improve deliverability
Engagement Tracking Insights
Understand how recipients interact with your campaigns:
- Open and click trends: Daily engagement patterns to optimize sending schedules
- Domain-specific engagement: How recipients from different email providers engage with your content
- 24-hour activity patterns: Identify peak engagement hours for your audience
- Geographic performance: See where your most engaged subscribers are located
- Device and platform insights: Understand whether recipients engage more on mobile or desktop
- Individual link performance: Track which specific links generate the most clicks
Detailed Campaign Data
Access granular information for deeper analysis:
The detailed data section provides comprehensive status information for every email sent in your campaign, allowing you to track the complete lifecycle from send request to final recipient action.
Data Export Capabilities
Export your campaign data for advanced analysis and reporting:
- Domain Statistics: Download performance metrics broken down by email service providers
- Individual Tracking Data: Export per-recipient engagement information for customer segmentation
- Bounce and Failure Analysis: Get detailed information about delivery failures for list cleaning
SMS Campaign
Share your marketing message with your contacts through SMS. Before you can create an SMS campaign, make sure the following are in place:
- Activate the SMS feature: Enable SMS for your account. See the SMS documentation for how to get started.
- Create an SMS_USER: Set up the SMS_USER that will be used to send your campaigns.
- Create and approve an SMS template: Create your SMS template and submit it for review. A template can only be used in campaigns after it passes review.
- Upload contacts with phone numbers: Go to Marketing → Audience, click Add contact to upload your contacts. Contacts have multiple attribute fields — for SMS campaigns, make sure the mobile numbers are uploaded into the Phone field.
Create an SMS Campaign
Step 1: Define Your Audience
Determine recipients: Choose who will receive your campaign:
- All Contacts: Send to your entire contact list
- Tags: Target contacts with specific tags
- Segments: Use advanced filtering to target specific contact groups
💡 Tip: Only contacts with a valid mobile phone number can receive SMS campaigns.
Step 2: Add Sender ID (Optional)
Sender ID (optional): The name or number that appears as the sender ("From") on recipients' phones. Feel free to skip this if you don't need one.
Step 3: Select SMS_USER
SMS_USER: Select the SMS_USER for this campaign
Step 4: Choose SMS Template
SMS Template: This is what your recipients will read
- Click Choose Template and select one of your approved templates
- Only templates that have passed review are available for campaigns
Variable settings: If your template contains variables, you need to replace each variable with one of the following:
- Use a default value: The same fixed value is filled in for all recipients
- Use a contact field: Select one of the contact attribute fields (e.g., Name, Phone, Gender, Birthday) — each recipient receives the message with their own value for that field
⚠️ Note: If a contact's selected field is empty, the default value is used instead.
Step 3: Schedule & Send
Set execution time: Choose when to send your campaign
- Send now: Immediate delivery
- Schedule: Set a specific date and time
- Time zone: Ensure you select the correct time zone for your audience
SMS Campaign Report
Understanding your campaign performance is crucial for improving your marketing results.
Overview Statistics
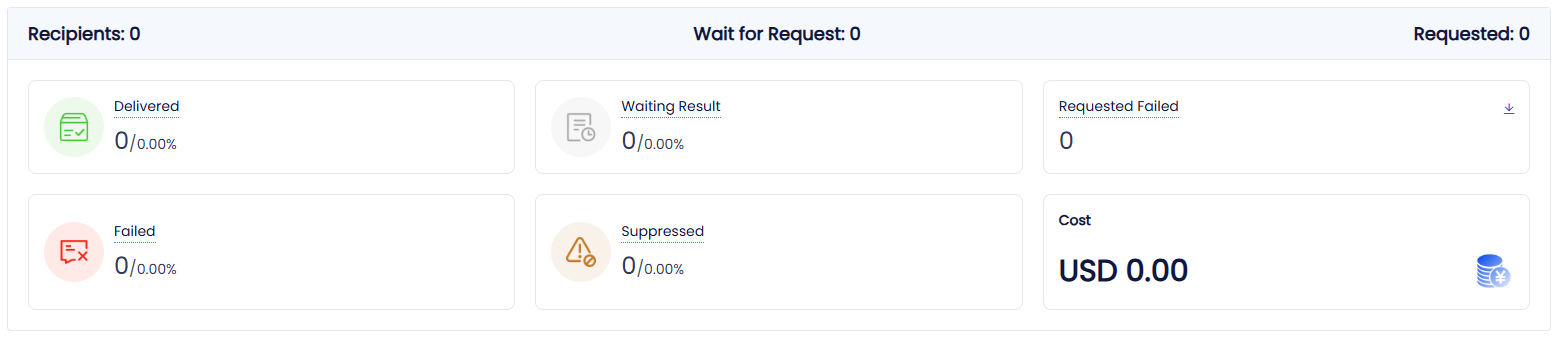
| Metric | Description |
|---|---|
| Requested | Total number of sms send requests submitted to Aurora SendCloud. |
| Delivered | Successfully delivered to recipient's device. Rate = Delivered ÷ (Requested - Requested Failed - Suppressed) |
| Waiting Result | Sent to carrier, awaiting delivery confirmation. Rate = Waiting Result ÷ (Requested - Requested Failed - Suppressed) |
| Failed | Delivery unsuccessful (device off, content blocked, timing restrictions). Rate = Failed ÷ (Requested - Requested Failed -Suppressed) |
| Suppressed | Blocked by Aurora SendCloud system filters. Rate = Suppressed ÷ (Requested - Requested Failed) |
| Requested Failed | Account does not have enough SMS credits. |
| Cost | The total amount charged for this campaign. |
Status Data
The Status Data section shows the sending details for each recipient, so you can review exactly what happened to every message in the campaign.
- Filter by status: View records by All, Delivered, Waiting Result, Failed, or Suppressed
- Search by recipient: Look up a specific recipient by phone number
- Detailed fields: Each record includes the Recipient, Country/Region, Status, Requested Time, Delivered Time, and Cost
- Download: Export the details for deeper analysis. The data details are saved for 6 months by default — please download them in time.
- Tag recipients: Tag the recipients of a specific status (e.g., all Failed recipients). Once tagged, you can select these contacts by tag as recipients in future campaigns — useful for retries or follow-ups.
Quick Reference
- Test subject lines with A/B campaigns
- Use consistent sender names
- Segment your audience for relevance
- Monitor deliverability with warm-up sending
- Check account credits before large sends
- Verify time zones for scheduled campaigns
- Review template compatibility across devices
- Monitor bounce rates and list health
- Use Google Analytics tracking
- Export data for deeper analysis
- A/B test different elements regularly
- Review geographic and device insights
Updated 10 days ago