
SMS
Complete guide for SMS integration with Aurora SendCloud, including setup, template creation, pricing, piece calculation, testing, and campaign management with detailed instructions and examples.
SMS Overview
Short Message Service (SMS) is a fundamental text messaging component in mobile communication systems. As one of the most critical messaging channels, SMS has been providing reliable services for decades across various use cases:
- OTP: Two-factor authentication and verification codes
- Marketing: Promotional campaigns and customer engagement
- Notification: System alerts, reminders, and status updates
SMS Piece Calculation
Understanding how SMS pieces are calculated is crucial for cost estimation and message planning. The number of SMS pieces depends on the character encoding standard used:
GSM-7 Encoding (Standard)
- 1 piece = up to 160 characters
- SMS message requests exceeding 160 characters are split into multiple pieces (each piece supports up to 153 characters due to piece overhead)
- The following characters use two characters for encoding:
|€^{}[]~\Non-GSM-7 Encoding (Unicode/UCS-2)
- 1 piece = up to 70 characters
- SMS messages exceeding 70 characters are split into multiple pieces (each piece supports up to 67 characters due to piece overhead)
Integrate SMS Service
Setting up SMS integration with Aurora SendCloud is straightforward and provides you with the credentials needed to send messages programmatically. This integration enables you to leverage Aurora SendCloud's global SMS infrastructure for your applications.
Quick Setup Steps
Step 1: Navigate to Integration Module
- Log into your Aurora SendCloud platform dashboard
- Locate the left-side navigation menu on the Overview page
- Click on the fourth icon labeled [Integrations]
Step 2: Begin SMS Connection
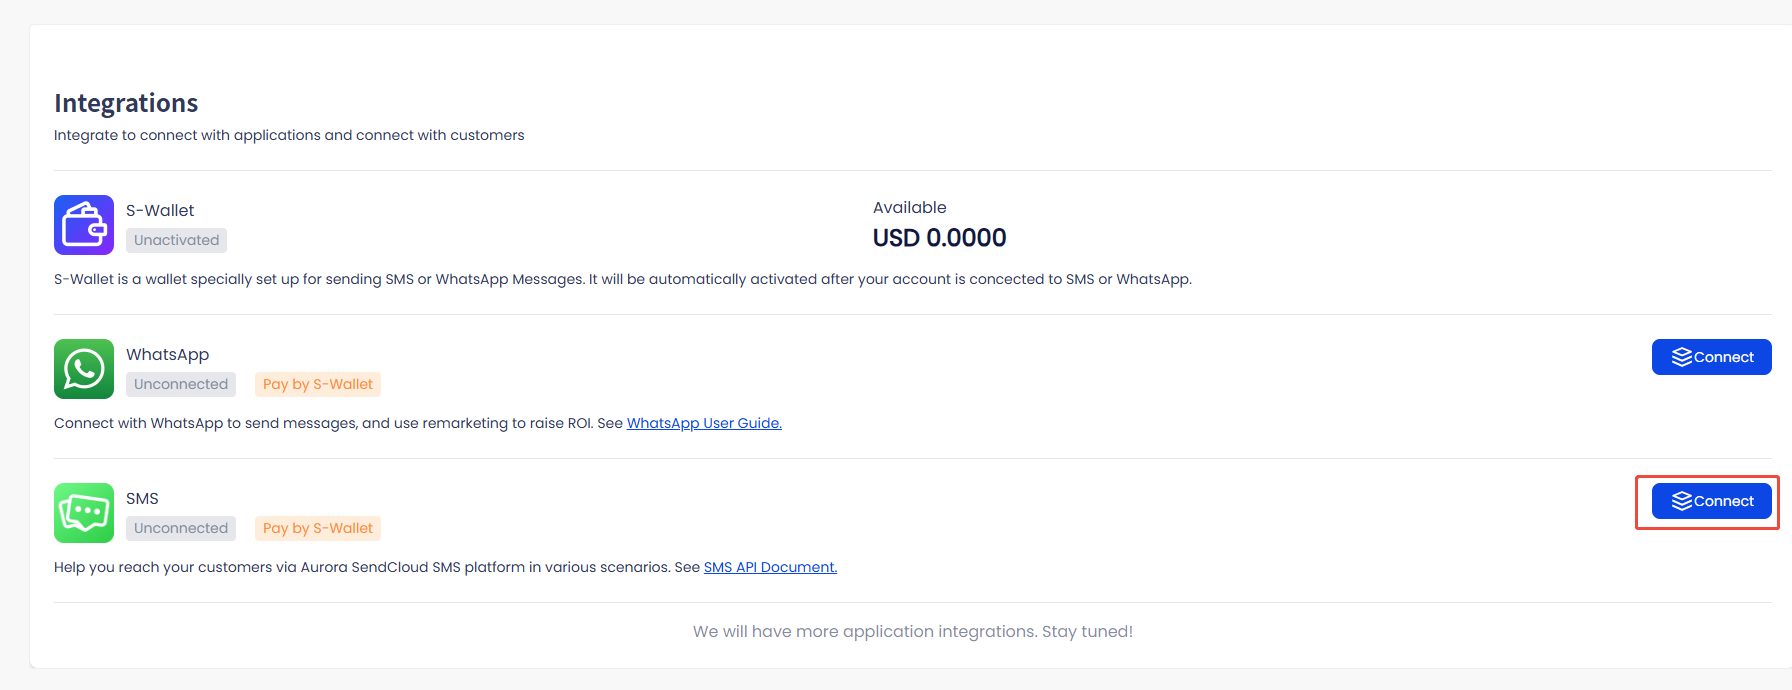
- On the Integration page, locate the SMS service option
- Click the blue [Connect] button next to SMS
Step 3: Complete Connection Setup
- Confirm that you want to connect the SMS service
- The system will generate unique credentials for you:
- SMS_USER: Your unique identifier for SMS operations
- SMS_KEY: Your authentication key for secure access
Integration Complete!
Your SMS service is now connected. You can immediately start using your credentials to send SMS messages via the Send SMS API.
Understanding Your SMS Credentials
Once integration is complete, you'll receive two critical pieces of information:
SMS_USER
- Unique identifier for your SMS service
- Used to authenticate your account
- Required for all SMS API calls
- Can be regenerated if needed
SMS_KEY
- Secret authentication key
- Provides secure access to SMS services
- Must be kept confidential
- Used in conjunction with SMS_USER
Security Best Practices
Credential Security Guidelines
Storage
- Store credentials in environment variables, not in code
- Use secure credential management systems
- Never commit credentials to version control
Access Control
- Limit access to credentials on a need-to-know basis
- Use role-based access controls
- Regularly audit who has access to credentials
Rotation
- Periodically rotate your SMS_KEY for enhanced security
- Update all applications when credentials change
- Keep backup access methods during rotation periods
Credential Management Actions
Viewing Credentials
- Navigate to Integrations → SMS to view your current credentials
- SMS_USER is always visible
- SMS_KEY may be masked for security (click to reveal)
Regenerating Credentials
- Click [Regenerate] next to your credentials if needed
- Update all applications using the old credentials
- Test thoroughly after regeneration
Important: When you regenerate credentials, your old SMS_KEY becomes invalid immediately. Make sure to update all applications using the SMS service to prevent disruption.
Testing & Validation
After completing the integration, it's important to verify everything is working correctly:
Step 1: Test API Connection
Use the Send SMS endpoint to send a test message:
Step 2: Verify Message Delivery
- Check that the test message is received on the target device
- Verify the message content is displayed correctly
- Note the delivery time for performance baseline
Step 3: Check Dashboard Analytics
- Navigate to your SMS dashboard to see message statistics
- Verify the message appears in your sent messages log
- Check that your S-Wallet balance has been debited correctly
Troubleshooting Common Issues
Authentication Errors
Symptoms: 401 Unauthorized or authentication failed errors
Solutions:
- Verify SMS_USER and SMS_KEY are correct
- Check for extra spaces or characters in credentials
- Ensure credentials haven't been regenerated recently
- Confirm you're using the correct API endpoint
Insufficient Balance
Symptoms: Balance-related error messages
Solutions:
- Check your S-Wallet balance
- Add funds to your S-Wallet if needed
- Verify pricing for your target countries
- Check if there are any pending charges
Message Not Delivered
Symptoms: API success but message not received
Solutions:
- Verify the phone number format (include country code)
- Check if the number is active and can receive SMS
- Review message content for compliance issues
- Check carrier-specific restrictions
- Wait a few minutes as delivery can be delayed
Ready to Start?
With your integration complete, you can now:
- Send SMS messages via API
- Create and manage templates
- Monitor delivery performance
- Scale your messaging operations
Explore our API documentation for detailed implementation guides.
SMS Template Management
Creating effective SMS templates is essential for successful messaging campaigns. This section covers everything you need to know about template creation, configuration, and management.
Creating a New SMS Template
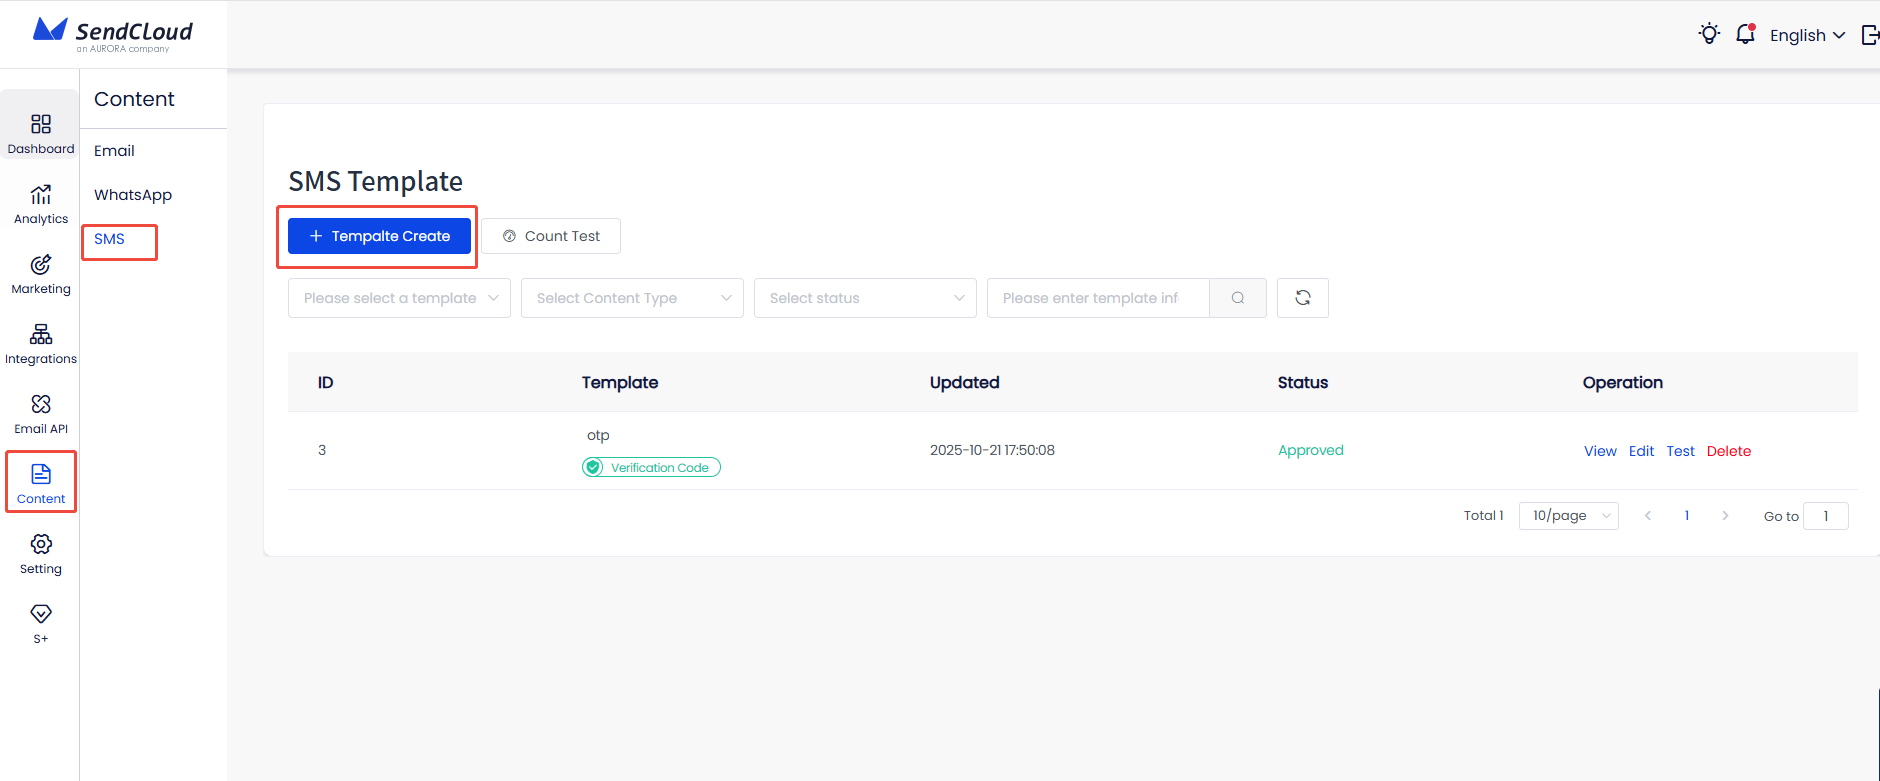
Step 1: Access Template Creation
Navigate to Content → SMS in the left-side navigation bar, then click the + New Template button in the upper-left corner.
Step 2: Configure Template Settings
Complete your template configuration with the required fields outlined below.
1. Content Type
- Purpose: Selecting the appropriate content type improves approval rates
- Options:
- OTP: For verification codes and two-factor authentication
- Notification: For system alerts, reminders, and status updates
- Marketing: For promotional campaigns and customer engagement
- Best Practice: Choose the type that most accurately reflects your message purpose
2. Template Name
- Purpose: Internal identification and organization
- Requirements: Use descriptive names for easy management
- Example: "Welcome_OTP_Verification" or "Order_Confirmation_Notification"
3. Message Content
- Character Limits: Consider SMS piece calculation (160 chars for GSM-7, 70 for Unicode)
- Variables: Use custom variables like
%name%for personalization - Links: Include spaces before and after links; must start with
http://orhttps:// - Requirements:
- Variable names must be in English
- Use English format
%symbols - Provide examples for all variables used
4. Applicant Country/Region
- Purpose: Reference for review process (not a usage limitation)
- Selection: Choose all countries where you plan to send messages
- Impact: Helps reviewers understand your use case and target audience
Step 3: Save and Submit
Choose between saving as draft or submitting for review based on your needs.
Content Best Practices
Variable Usage
Good: Hello %customer_name%, your order %order_id% is confirmed.
Bad: Hello %customer_name%, your order is ready.
Link Formatting
Correct: Check your order status here: https://example.com/orders
Incorrect: Check your order status here:https://example.com/orders
Content Type Examples
OTP Templates
Your verification code is %code%. Valid for 10 minutes. Do not share this code.Notification Templates
Hi %name%, your order %order_id% has been shipped. Track it here: https://example.com/track Marketing Templates
🎉 Special offer for %name%! Get 20% off your next purchase. Use code: SAVE20. Shop now: https://example.com/sale Template Submission Process
Understanding Save vs Submit
Save as Draft
- Saves template configuration locally
- Allows for future editing and refinement
- Template remains in draft state
- Cannot be used for sending messages
Save and Submit for Review
- Submits template to Aurora SendCloud for official approval
- Template enters review process
- Only approved templates can be used for sending
- Review times vary based on content type and region
Review Process Timeline
Template review times vary by content type and region. OTP templates typically have faster approval times than marketing templates. Plan your campaigns accordingly and submit templates well in advance of your launch dates.
Template Testing & Validation
Once your templates are approved, you can test them to ensure they work correctly:
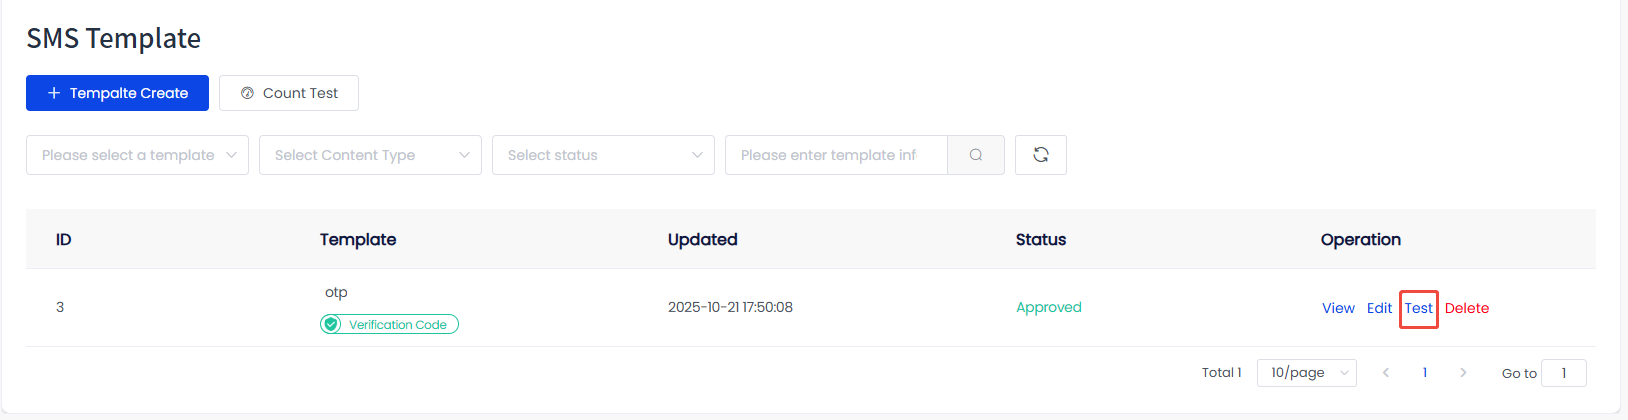
Step 1: Access Test Function
Locate an approved template in your template list and click [Test] in the actions column:
Step 2: Configure Test Parameters
Enter the required information in the test popup:
- Recipient's mobile number: Use a valid phone number you have access to
- SMS_USER: Select from your available SMS_USER
- Variable values: Provide actual values for any variables in your template

Step 3: Send Test Message
Click [Send] to deliver the test message and verify:
- Message delivery and timing
- Variable replacement accuracy
- Link functionality
- Character encoding and display
- Overall message appearance
Testing Best Practices
- Test with different phone numbers and carriers when possible
- Verify variable substitution works correctly
- Check that links are clickable and lead to correct destinations
- Test in different countries if you plan international campaigns
- Keep test logs for troubleshooting
SMS Message Status
Understanding SMS delivery statuses helps you track message success and troubleshoot issues:
Status Types
- Sending - Message queued for delivery to carrier
- Delivered - Successfully delivered to recipient's device
- Waiting Result - Sent to carrier, awaiting delivery confirmation
- Failed - Delivery unsuccessful (device off, content blocked, timing restrictions)
- Suppressed - Blocked by Aurora SendCloud system filters
Most messages show "Delivered" within minutes. "Waiting Result" can last several hours depending on carrier response times.
SMS Sender ID
The Sender ID shows who sent the message. With a Sender ID, you can send SMS from a custom sender (brand name or website name) instead of a random string of numbers.
If you have not registered a Sender ID, Aurora SendCloud will randomly assign an ID for you to send messages. Therefore, you can send messages without registering.
The rules vary greatly from country to country. Not all countries offer Sender ID registration, and some countries charge for the ID, subject to local carrier policies.
Create Your Sender ID
-
Go to Integration > SMS > Sender ID. You need to provide the following information for registration:
- Sender ID
- Applicant country or region
-
Our staff will contact you and you may need to submit the relevant Sender ID registration materials as requested.
-
Wait for registration and review. Review times may vary by region.